
Showing posts with label kids. Show all posts
Showing posts with label kids. Show all posts
Thursday, August 21, 2014
A Visit from the Tooth Fairy...
The Tooth Fairy visited our house last week. Tucked inside of his Monster Tooth Pillow was a tiny letter from the Tooth Fairy herself. Along with the letter, she also left Evan some VERY sparkly money! He was SO excited!

FREE Printable Banner Letters
This is a quick way to print a banner at home. You can print it on any color card stock to make the perfect color combo to compliment the theme!
Simply right click on the letter that you need, save image, and print!


Simply right click on the letter that you need, save image, and print!


Thursday, March 27, 2014
Chocolate Strawberry Drop Cookies
My friend Tina made these cookies for a cookie exchange back in December. I finally remembered to ask her for the recipe and I was pleased to know that they are SUPER easy to make! I love to turn cake mixes into cookie dough. One of my favorite ways is Rolo Cookies. The combination of chocolate and strawberries is always delicious, so why not turn it into a cookie!
 Ingredients:
 Place drops of cookie dough onto baking sheet and bake for 10-12 minutes.


- 1 Box of Duncan Hines Strawberry Cake Mix
- 1 Egg
- 1/4 Cup Water
- 1/4 Cup Flour
- 1/2 Vegetable Oil
- 1 Cup of Chocolate Chips (I used 3/4 Cup mini chocolate chips because that is what I had on hand)
Makes 2 Dozen Cookies
Preheat oven to 350 degrees. Using a mixer blend cake mix, flour, water, egg, and oil. When they are well combined hand stir in the chocolate chips.
Let them cool or enjoy them warm!
Sunday, March 2, 2014
Sharp Cheddar and Gruyere Mac and Cheese
I am notorious for throwing together a homemade mac and cheese with random cheese that I have on hand. Some are winners and some are just okay. This one is definitely one I will be making again. I have used this same milk/butter/egg/flour combo a few times before. I like it because it creates a great base for the cheese. You can substitute other cheeses, but I like to make sure that at least one of them is on the stronger side. I like cheese any cheese...YUM!

Ingredients:
Ingredients:
- 1 1/2 Cups of Sharp Cheddar
- 1 1/2 Cups of Guyere
- 12 oz of Pasta cooked al dente (I used medium shells)
- 3 Tablespoons Butter
- 3 Tablespoons Flour
- 1 teaspoon Ground Mustard
- 1/4 Cup Heavy Cream
- 1 1/2 Cups Milk (I used 1%)
- 1 Egg
- Salt and Pepper to taste
While the water for the pasta is coming to a boil I shred the cheese and gather and measure my ingredients because this is one of those recipes that the last 5 minutes is when it all comes together and you can't be scrambling for things.
Once the pasta is cooked and drained, set it aside. In the pot you boiled the pasta in melt the butter. Once the butter is melted whisk in the flour. Whisk continuously over medium-low heat for about 3 minutes, don't let it burn. Slowly add the milk, heavy cream, and ground mustard to the butter/flour mixture. Continue whisking until sauce thickens. This will take about 5 minutes. Reduce heat to low. The next step is a little (just a little) tricky. Remove about 1/4 cup of the sauce mix. Gradually whisk the sauce mix into the bowl with the beaten egg. Make sure you do it slowly so that you don't cook the egg. Pour the egg mixture into the sauce mixture, mix well. Next, add the shredded cheese, salt, and pepper. Mix until cheese is melted. Last add the cooked macaroni and stir.

Tuesday, February 25, 2014
Parmesan Garlic Orzo
I love easy side dishes and this one makes the top of my list! It is not just easy, it is quick too. This can be made in about 15 minutes and it is sure to please your whole family!

Ingredients:
- 1 1/2 Cups Orzo
- 3 Tablespoons of Butter
- Salt and pepper to taste
- 1 Tablespoon Minced Garlic
- 1/3 Cup Shredded Parmesan Cheese
- 1 Chicken Bouillon Cube (this is optional, but it gives it a little more flavor
serves 4-6
Bring 3 cups of water and chicken bouillon cube to a boil. Cook orzo 8-9 minutes (or according to package). Drain orzo. Add butter and garlic to pot. Stir constantly while the butter melts. Return the orzo to the pot and mix with the butter. Add Parmesan cheese, stir, and salt and pepper to taste.

Saturday, January 11, 2014
Disney Bucket List 2014
Each time we visit Disney World I create a bucket list of fun and exciting things for us to do. Some of them are new to us and some are old favorites. I like to find a few special things that are at our resort because you just never know when we will stay there again. I enjoy finding the perfect mix of hidden magic and must do experiences. We are very lucky to visit often but every time we go the experience is different. This list is for our January 2014 trip. I know that we won't do/see all of these things, but I like to have the list so that we can continue to try new things. My must do list is very long and it grows after each visit.

- Find DiVine-DiVine is a street performer at Animal Kingdom. She is hard to find for a couple of reasons. She is fully decked out in face paint and foliage to blend in with the surroundings. She is rarely listed in the times guide, but from what I hear you can ask Cast Members for details.
- Ask for Ketchup at Whispering Canyon Cafe- This is a table service restaurant located inside of Wilderness Lodge. I have been told that something crazy will happen when you ask for ketchup at this restaurant. I guess we will have to wait and see...
- See the Trains and Geyser at Wilderness Lodge- Fire Rock Geyser is a geyser that erupts at the top of the hour throughout the day. It shoots water 120 ft into the air. Nestled inside the Villas at the Wilderness Lodge is Walt Disney's personal train collection. You don't have to be a guest at this resort to enjoy it. It is available for all to see.
- Lunch at Be Our Guest- Be Our Guest is the newest Quick Service/Table Service restaurant at Magic Kingdom. During our last trip we scored a dinner reservation and it was GREAT. You can check out my dinner review here. This time we are hoping to eat there for lunch. During lunch it is a Quick Service restaurant with lots of yummy sounding options. You can even get a cupcake topped with the "Grey Stuff." So don't forget to "Try the Grey Stuff, It's delicious!"
- Try a Dole Whip- This is a pineapple soft serve float that according to most Disney Addicts is a "MUST HAVE" snack. I have taken a sip of a friend's Dole Whip and liked it but I have never had one of my own. No one else in my family has ever tasted this signature snack. There is always a line at Aloha Isle in Magic Kingdom, but I plan to wait this time!
- Meet Anna and Elsa in Norway- Anna and Elsa are the stars of the newest Disney movie "Frozen." We saw the movie back in November and LOVED IT! We don't often wait in line to meet princesses because I have two little boys, but this is one exception they are willing to make and that makes this Mom happy:)
- Visit Talking Mickey- At our visit in November we able to get FastPasses to meet the Magician Talking Mickey at Town Square Theater in Magic Kingdom. This was one of the most memorable moments of the entire trip. It actually brought tears to my eyes. My little ones have not stopped talking about it, so it makes the list AGAIN!
- Watch Electrical Water Pageant- This is a water parade on the Seven Seas Lagoon. It can be seen from 5 different resorts at various times. We plan to let the kiddos play in the sand and relax and watch the lights pass by.
- Watch Lights Motor Action Stunt Show- This is a high action stunt show that includes a favorite character, Lightning McQueen. We saw this show a few years ago and would love to see it again. Make sure to check the times guide because it is only performed a few times a day. I have also heard a rumor that the show may be phasing out.
- Chip and Dale Campfire Sing a long- Each night at 7pm Chip and Dale host a campfire sing-a-long at Fort Wilderness behind the Meadow Trading Post. S'mores kits and marshmallow sticks are available for purchase for $5 or feel free to bring your own. We have attempted to do this in previous visits, but it has always seemed to hot to sit at a campfire. This is our first trip in January and the weather should be perfect.
- Wake up call from a character- I have never done this, but from what I have researched all you have to do is request a wake up call and the next morning a character will call. I will let you know how it goes in my bucket list update after the trip.
- See Turtle Talk with Crush- This a one of our favorite attractions at Epcot because it is always a good laugh and never the same experience. It makes our list because we missed it last time.
- Meet Ralph and Vanellope- These characters from Wreck-it Ralph are available for photo ops and HUGS inside the Magic of Disney Animation.
- Draw a character at Animation Academy- Inside the Magic of Disney Animation you can watch a 9 minute film on how characters are drawn and then an animator will draw a character live as you watch and follow along to make a character of your own.
We are going again!!! Here is the link to my latest Bucket List

Saturday, December 7, 2013
Snowman Hat Centerpiece

Materials:
- Coffee Can
- Black Plate or Charger
- Black Spray paint
- Red Ribbon
- A Small handful of fake snow
- A Sprig of Holly
Spray paint empty coffee can and plate (or charger) with black spray paint. Let it dry. Tie a piece of red ribbon around the coffee can. Set can on plate. I did not attach the can to the plate because I wanted to be able to take it apart for easy storing. Tuck a piece of holly into the ribbon and sprinkle a little bit of fake snow on it. That's it, easy peasy!
Monday, November 25, 2013
Rolo Cookies

Ingredients:
- Box of Devils Food Cake Mix
- 2 Eggs
- 1/3 Cup Vegetable Oil
- 24 Rolos
- Powdered Sugar
Makes about 2 Dozen Cookies
Preheat oven to 350 degrees. In a medium bowl, combine eggs and oil. Then add in cake mix. The first time I made these I used my electric hand mixer and the batter was so thick that my mixer had a tough time with it. It was much easier to mix it my hand. Next take a scoop of batter a little smaller than the size of a ping pong ball and press a Rolo inside. Make sure that the dough covers the entire piece of candy. Place on baking sheet. Bake for 7-8 minutes. Sprinkle with powdered sugar and ENJOY!

Saturday, November 16, 2013
Ice Cream Cone Cupcakes
Yesterday, I was in need of an idea for the bake sale. I only had a few hours to work with and I did not want to go to the grocery store. I looked in the pantry and saw that I had a couple of boxes of cake mix and icing. I wanted to make something a little more fun than regular cupcakes. I decided to bake the cupcakes in Ice Cream Cones. I only had 18 ice cream cones on hand so I made a mix of those and regular cupcakes.
 Now I will also tell you that I am not perfect. Sometimes things just don't go as I had planned and yesterday's baking was one of those times. I wasn't quite sure how long to bake the cupcake cones. I had made these before but couldn't remember exactly the baking time. When I took them out of the oven to check them, the cones tipped over. Clearly they were not done because the batter spilled out of them. First batch=FAIL! I didn't let it discourage me (mainly because I didn't have any choice this was baking with a purpose not for fun). I started a new batch. This time I placed the cones in muffin tin for a little more support. I also knew that I needed to bake them longer before checking them. When all was said and done, they were cute! I had a few less than I had hoped, but all in all it was fine.

Ingredients:
 I needed a way to transport them, so I cut holes in a thick piece of card stock and placed them in a tin plate. It worked pretty well, but I am still looking for a better method. Maybe in individual cups? If you have any ideas let me know. These were a HUGE hit at the bake sale and I would like to make them again.


Ingredients:
- Box of Favorite Cake Mix prepared according to package
- Favorite Icing
- Sprinkles
- 24 Ice Cream Cones (the flat bottom kind)
Make cake mix according to package. Place ice cream cones in muffin tin and fill about 2/3 of the way to the top. Do as I say not as I did in picture. I filled mine just a little too full. Bake at 350 for 14-16 mins. Let them cool completely, add icing, and sprinkles.


Friday, November 15, 2013
Thankful Tree... We Have So Many Things to be Thankful For

We have so many things to be thankful for, both big and small. Sometimes you just need to stop and think about all of the amazing things in our lives that we have to be grateful for. I know a lot of people take part in the Facebook thankful posts, but I wanted ours to be a little more personal and I wanted to get the whole family involved. One of my Thanksgiving/November projects was this Thankful Tree. My family wrote some of the sweetest things. Several of them almost made me cry.
This is an easy and very inexpensive craft. You probably have all of the materials you need!
Materials:
- Cardstock
- Hole Punch
- Vase
- Random Tree Branches
- Piece of Ribbon
- Tag Die Cut/Punch
- Pen
We gathered a few random small branches from our backyard and placed them in a vase. I had some extra ribbon from the Fall Mickey Mouse Wreath so I tied a bow around the vase to make it a little more festive. I used a die cut punch to create the "leaves" for the tree. My family then wrote down a few things that they were thankful for on the tags, we punched a hole in it, and then hung it on the branch. I made lots of tags so we have been adding "leaves" to it and hopefully we will continue over the next few weeks.
If you don't have a tag punch, you can use a circle, square, or cut them by hand.
Another fall craft made with scraps....
2x4 Pumpkins

and a free printable...
Thanksgiving Invitation

Another fall craft made with scraps....
2x4 Pumpkins
and a free printable...
Thanksgiving Invitation
Friday, October 25, 2013
2x4 Pumpkins
I love fall! So of course I love to craft and decorate for the season. This year I made a few things with scrap wood. I did this for a couple of reasons. 1. My boys think of it more as "Building" not crafting and 2. They have discovered that they love to paint. I love when they want to participate so I am all for it! Don't be surprised if I continue the "building" crafts into winter!

Supplies:
- 2x4 (or 2x2) Piece of wood
- Orange Paint
- Wood Glue
- Various Artificial Fall Foliage, Berries, or other
- Ribbon
- A stick with approximately a 1 inch diameter (for the stem)
- A Piece of Sand Paper
- Hot Glue Gun
First I cut the 2x4 to the appropriate lengths. I made the large pumpkin with 2- 8 inch and 2-10 inch pieces. The smaller ones are made with 2- 6 inch and 1-8 inch pieces. This allowed me to make 3 small and 1 large without wasting any of the piece of wood. PERFECT!!!! Next, I lightly sanded the rough edges. I then glued the pieces together. The small pumpkin has 6 inch, 8 inch, 6 inch and the large is 8 inch, 10 inch, 10 inch, 8 inch. Make sure to center the smaller pieces on the larger ones. Then using two shades of orange paint ( I put them both on a paper plate and lightly swirled them together as I painted the wood) I painted all sides of the wood. The wood needed to coats of paint.

After they were dry I glued a piece of the stick to the top of the pumpkin. When that glue was dry, I tied a piece of ribbon around the stick and then attached a few pieces of the accessories. I used the hot glue gun to secure them in place.


Make sure to check out the Frankenstein I made with a piece of scrap wood
Here is the link to Frankenstein


After they were dry I glued a piece of the stick to the top of the pumpkin. When that glue was dry, I tied a piece of ribbon around the stick and then attached a few pieces of the accessories. I used the hot glue gun to secure them in place.


Here is the link to Frankenstein
Wednesday, October 16, 2013
Frankenstein From a Piece of Scrap Wood

Supplies:
- 2 Large Google Eyes
- Green Paint
- Black Felt
- Tiny Piece of White Felt
- Craft Wire
- Black Paint
- 2 Bolts
- Hot Glue Gun
- Scissors
- Paint Brush
- Scrap Piece of Wood (I used a 1x6 that was 12 inches long)
This was a very easy project to complete. The most time consuming part was waiting for the paint to dry. I actually got the piece of wood from the hardwood store for $0.50. I drilled a hole in each side of "the neck" that was slightly smaller than the bolt. I painted all sides of the board. I used two different colors of green paint to get the color that I wanted. While the paint was drying I cut the felt hair and eyebrows and cut the wire for the stitches . Once the paint was dry I attached the eyes, hair, eyebrows, and bolts with a hot glue gun. The stitches around the head were a little tricky at first, but once I figured out how to best attach them I was good to go. I wrapped the wire all the way around the piece of wood and twisted the ends together to keep it in place. Then I glued the stitch pieces on top of that wire. Then I used black paint for the nose and mouth. I also rubbed a little black paint on my fingers and placed on the bolts and various placed on the face to make it look worn/dirty. Last I attached the small (tooth) piece of felt.
Check out what else I made with wood
2x4 Pumpkins
Spooky Spider Ice Cubes
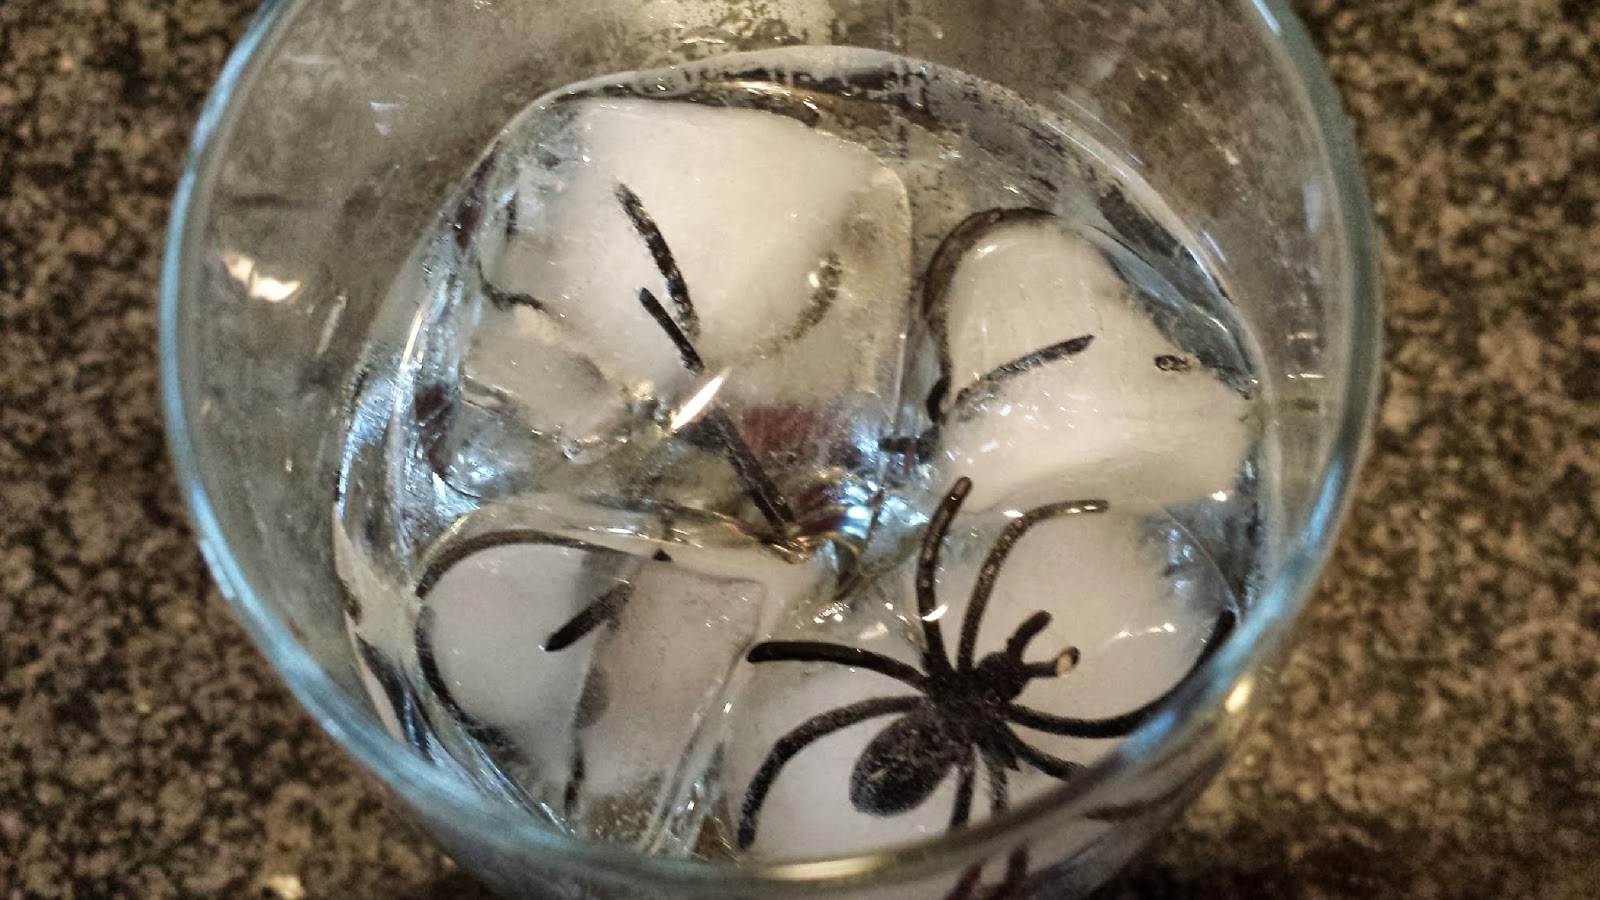
Supplies:
- Plastic Spider Rings
- Ice Cube Trays

They were concentrating.

Tuesday, October 15, 2013
My Disney Bucket List 2013

My Disney World countdown is into the teens and I have been diligently planning. This trip is different from other trips with have taken in the past. The first thing that is different is that we are NOT doing the Disney Dining Plan. The second is that we are staying at moderate resort. The third thing is that we are traveling without the Henderson Family (the other Magical Mom's family). We are quite sad that they will not be joining us and I am secretly hoping that they will show up to surprise us!!!!! Ok maybe it is not a secret... I have been trying to convince her for weeks.
Since we are not doing the Dining Plan, we don't have a lot of dining reservations. I feel like since we are not tied to reservations we have more free time throughout the day, I am hoping to be able to cross off some things that we have just not had time to do in the past. This is not my list of top things to do at Walt Disney World. This is a list of what I hope to accomplish during this trip. I am excited that my list includes the perfect mix of must do's and experiences that are "off the beaten path".
- Ride Test Track- My oldest son and I have ridden it, but it has always been closed for refurbishment while my husband has been there. This time we will ALL ride it!
- Mail a Coconut from Caribbean Beach Resort. Yes, you read that correctly. We plan on mailing a real coconut from the gift shop at our resort. Who will be the lucky one to receive it?
- Go to Mickey's Very Merry Christmas Party- Scott and I attended last year without the kids and the kids and I attended the year before but we have never all attended at the same time. This year is it!
- Take the kids to Illuminations- We have never taken the kids to Illuminations. Crazy right?!? We have used Kids Night Out babysitting service a couple of times and we always end up going to Epcot for an adults only evening. This time I want to take them with us.
- See the Jammin' Jingle Parade- We have seen the Jammin Jungle Parade at Animal Kingdom, but since we will bet there during the Christmas season we plan on seeing this holiday version of the parade.
- Go to Tom Sawyer Island. My boys are very much into exploring. We plan to take the short boat ride to the island and spend some time checking it out! I also plan on getting to the bottom of the "Paint Brush" stories I have heard!
- Captain EO- I have heard rumors that this attraction will be closing soon and there is no way I want to miss this MJ experience!
- Find DiVine- DiVine is a street performer in Animal Kingdom that hides a midst the trees and foliage. She can be difficult to spot but is a magical sight to see once you do find her.
- Watch Festival of the Lion King Show- I always feel so rushed when we are at Animal Kingdom and we always end up missing the great shows. Hopefully not this time!
- Flag Ceremony at Magic Kingdom- Everyday at 5pm the Magic Kingdom has a flag lowering ceremony. We have never participated in it
- Rope Drop at Magic Kingdom- This is ALWAYS on my list and it should ALWAYS be on your list! It is one of the most magical moments. It sets the tone for the whole day, plus being some of the first people in the park is unforgetable!
- Go to the campfire and make s'mores at Caribbean Beach Resort- Every evening the Caribbean Beach resort (which is where we are staying) has a campfire and marshmallow roasting. They even have movies under the stars. Lots of resorts have similar evening experiences. Make sure to find out what is special about your resort.
The list of rides and attractions I want to do and see is very long. My youngest son is FINALLY 40 inches tall so we will not be using near as many rider swaps as we have in past visits. At the top of his list is......
13. Star Tours- This attraction is a family favorite. Both my boys love Star Wars and I am so excited for my little guy to ride it for the first time!!!
I will update when we return from our trip. It is important when you go to Disney World to have a plan, but don't make your plan too exact. You need room for flexibility. Personally I always want to do it all, but I know that is not possible. I think that it is possible to complete these 13 things, but plans can always change.
Wish me luck!
See how we did here!
Wednesday, October 9, 2013
Pumpkin Playdoh Party Favors

Many schools are encouraging healthy treats for parties and some are even suggesting non-food items. I decided that I was going to make Playdoh Jack-o-Lanterns for my son's preschool class. They were very simple and used very basic ingredients so it didn't cost me an arm and a leg either.
Supplies
- 2 Cups All Purpose Flour
- 4 TablespoonsVegetable Oil
- 4 Tablespoons Cream of Tartar
- 2 Tablespoons Salt
- 2 Cups Warm Water
- 1 6oz pakg Orange Jello
- Small Cello Bags
- Ribbon
- Happy Halloween Tag
- Black Sharpie
This is enough to do 10-12 small balls
In a medium sauce pot combine flour, salt, cream of tartar, and jello. Mix together. Then add water and vegetable oil and whisk until all the lumps are dissolved.
In a medium sauce pot combine flour, salt, cream of tartar, and jello. Mix together. Then add water and vegetable oil and whisk until all the lumps are dissolved.


After Playdoh cools place rounded balls into the cello bag. Attach the tag and tie the top closed with a small piece of ribbon. Last draw a Jack-o-lantern face on the bag with a black sharpie.
Here is the link for the Happy Halloween Tags

Monday, October 7, 2013
The Disney Countdown is ON!

Supplies:
- Card Stock
- Magnet Tape

Subscribe to:
Posts (Atom)